Wednesday, August 15, 2012

A Little Inspiration Mixed With a Little Luck


I've talked a lot about Ayden's Car Room, and although it's still in progress I thought I'd move on to another room for a while.  WARNING: it is another room that also belongs to Ayden (I can't help myself!)  so now we move into his bathroom/ the guest bathroom.  My inspiration came from this towel I found at Target and the brand that came with it.  
Dont you just love the colors?!

I thought it was so cute for a little boys bathroom but could also function for a guest bathroom.  When I first found these towels I wasn't even thinking about working on the bathroom so I decided not to purchase them.  I figured I would just go back and buy them when I needed them.  BIG MISTAKE!! When I finally decided to purchase them at my local Target, they were all out!  The next day I went to the Target next to my job and found out that they didn't even carry that style.  I tried looking online for stores that were carrying the towels but I couldn't find any close by.  At that time I gave up and just figured I would try to use the same colors and do something similar on my own.  Luckily target is one of my favorite stores to shop at especially their sale sections (if you didn't know Target always has sales on the ends of their aisles) as I was taking my usual trip down the sale sections at Target, to my surprise I came across the whole ABC circo brand and the towels I was looking for on sale so I got everything I wanted from there, there was no way I was going to let it get past me again! Target must've been getting a new collection of bathroom products because I also picked up a glass shelve on sale.  I thought I would look perfect especially since it matched the bathroom knobs.


So here's what a little spark of inspiration mixed with a little luck got me.

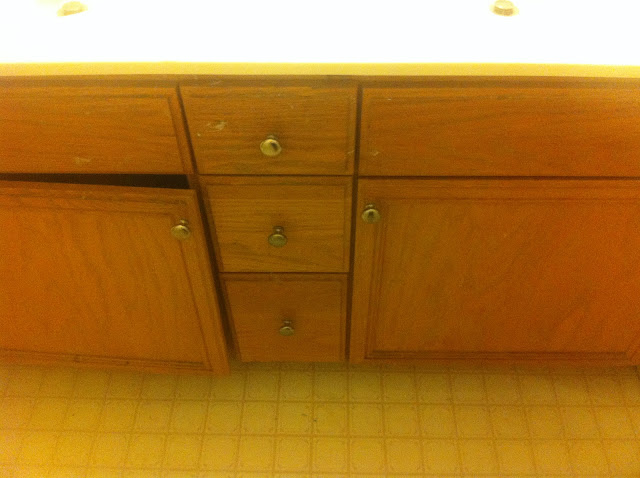
BEFORE:

AFTER:


Now there is a back story to this shower curtain.  It was a DIY gone wrong.  I couldn't find exactly what I was looking for in a shower curtain so I attempted to Do It Myself.  I taped it and began painting it, as I was letting the first coat dry my lovely son decided to walk on it so I just stopped there.  I will make another one but for right now this will have to do because after that mishap I am slightly discouraged. 

little feet evidence!

BEFORE:


AFTER:


BEFORE:


AFTER:


 BEFORE:

AFTER:


BEFORE:


AFTER:

Any one have suggestions on lighting? The other one just had to go but now I'm stuck on what to replace it with?


There was so much done to this room.  Painting, painting cabinets, diy letters, hanging things, shower curtain, and step stool.  I am loving the way it turned out! 

BATHROOM CHECKLIST:
1. add something around mirror
2. redo shower curtain
3. hang pictures
4. lighting


Sunday, July 8, 2012

From Big, Red and Plastic to a Car You Want to Show Off!

I have finally completely finished the car bed in Ayden's room.... Well for now I might come up with a brilliant idea in the future. Now as I promised this is my whole post just for the bed.

I'm not going to lie, before my son I was not a fan of those big, plastic fisher price race car beds. Then when we started talking about what to do in Ayden's room, Alex brought up the idea of a car bed. I was not fond of the idea... AT ALL!!! Then one day when I was looking for spray paint it hit me; I can use plastic spray paint and give the car a different look (an actual race car look!) I thought for sure someone had already done this but when I searched online I found nothing. 


Then I began searching Craigslist because I was definitely not going to buy the bed new for $300 if I was going to cover it with paint anyways. I dragged my feet a lot during this process since Ayden would be going from his crib to a bed and I was in no rush to make that happen. I'm glad I waited though, because the whole time I searched Craigslist I found car beds for about $60-$70 (not bad) but then I found one for $35 and just had to have it ASAP! Not only that but to add to my good fortune when I called the number we found out that they lived on the street right behind us. I must admit I got showered with luck on this project except… 
               
                 When we went to pick up the car I figured we can take it apart and put it in my car. We tried and tried but the back part was not coming off the sides! We ended up having to carry the bed to my house, needless to say it was a mission, I was sore the next morning, and we looked completely ridiculous carrying the huge bed around the corner. 

The "before" of the bed/ picture that was on the craigslist ad

 It took 6 cans of spray paint (and 2 trips because I miscalculated and thought we only needed 4).  I began by cleaning off the bed and as it dried I rushed to buy the spray paint; I used the Krylon fusion plastic spray paint in grey.  To completely cover the car it took me about 5 hours.  I wanted to make sure I got every inch so no red would show through.  

"During" Pictures 


YES, I did add to my craziness and spray painted in my front yard.  It was to big to do it anywhere else!


Almost Done


As you can see I blacked out the "rims" of the car bed.  I bought the Walmart brand spray paint because we had something else planned for them but liked how they looked as is and just left them.
My crazy hands after spray painting…. I really should've worn gloves!!
Once I was done spray painting and the bed dried we took the it upstairs, boy was that a struggle!  Since we couldn't take it apart it was  little too big and the stairs gave us trouble.  I did have to repaint some spots on my walls after that mission.  

From there, I took out my Silhouette Cameo (which is an amazing machine) and cut out a 12x12 circle of white vinyl, the numbers in black to give the look of a race car number and stuck it on the car's hood.  
                I chose number 11 because it's mine and Alex's "number" when we were in high school both our soccer jersey numbers were 11.  Thought I could incorporate it into Ayden's room!


It still looked plain to me after that, so I decided to add race car stripes to it.  All I did was tape and use high glass paint for the stripes.  And it is DONE!!! 


I love the view from his room!!


Hood of bed
Close up of stripes

Close up of vinyl circle and numbers

Blacked out rims

Top of stripes

Side view of car

Final Before and After


 What do you think?? Thanks for looking!


Tuesday, July 3, 2012

Baby Shower

Pastel Baby Shower


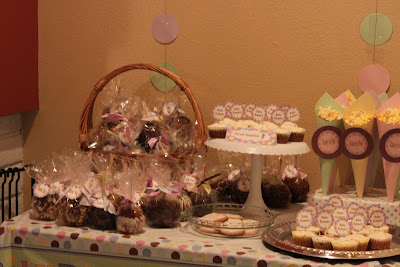
I had someone come to me and asked me to plan their baby shower, they didn't want to have a specific "theme" but instead wanted to focus on the colors.  Purple and brown were their main colors and then accent colors they wanted a pastel pink, blue, green and yellow. 

After seeing the caramel apples I made at the Wizard of Oz party (can be viewed here), the client asked me to make them for her party favors.  I made about 70 of them, I placed them on the left side of the table.  These were all individually wrapped and topped with ribbon and thank you tags that I made for the shower.


Next to that I placed the carrot cupcakes, I made "Baby Ramiro" labels on those and they sat on top of a cake holder I mad.


onesie sugar cookies


"Ready to Pop" popcorn cones.


Cake Pops


Diaper Cake 


Chocolate covered pretzel sticks made from a chocolate mold


Life saver pacifiers


Chocolate covered strawberries


Chocolate covered marshmallows


"Dont cross your legs" baby shower game pins


"Wishes For Baby" I made these cards and handed out to all of the guests to fill out and leave little notes for the Mother-to-be and baby.


"Baby Jeopardy" 


Centerpieces I made for each of the tables


Tissue poms I made to hang from different areas of the party.


They ordered food from a restaurant, told me the menu and I made labels to match the rest of the party.